
How to Use Git Smudge And Clean Filters
How to Use Git Smudge And Clean Filters
Learn how to filter out your sensitive data like passwords, api keys etc. in your source code BEFORE pushing it to Git – and how to re-replace it automatically with your credentials again when pulling from Git!
NOTE: This article is not a Git beginner’s guide. It assumes that you know the basics of Git, how to work with remote repositories and how to work with the terminal or shell.
The situation: You created another killer Arduino or ESP32 project (or any other programming language) and you want to put it into version control with Git and sync it to remote GitHub server. Maybe for backup purposes and/or to make it public so that other fellow makers can participate.
But often you have used hard coded sensitive credentials – i.e. your Wifi password and SSID. So if you want to avoid pushing your sensitive strings like passwords, usernames, server addresses, api keys etc. to your Git repo this tutorial comes in handy.
Have in mind: due to Git’s nature, it will save a complete history of each and every file that has been committed to Git. So you need to replace your sensitive strings from the very first commit on. Otherwise the sensitive strings are stored in the repository. Maybe you changed you sensitive data in a later commit, but this does not solve the problem. With Git you can travel back in time up until your very first commit. This is why you should care about your sensitive data from the very beginning.
HINT: Too late and your sensitive data is already pushed into the repo?
Fear not! It is possible to remove sensitive data from the whole git history. If you need to to do this, have a look at the BFG Repo-Cleaner by rtyley
How to Search And Replace Strings With Git Clean And Smudge Filter?
In this approach we will use the lesser known .gitattributes file and a clean/smudge filter.
Some people use a Git pre-commit hook, but this approach does only work in one direction.
This clean and smudge approach does work in both directions: if we stage a file, we run a filter to search and replace our sensitive strings with placeholder strings (clean). And if we pull the repo, we can use the same filter in reverse to automatically replace the non sensitive placeholder strings with the sensitive strings we need (smudge) – noice! Let’s dive in.
What Is the .gitattributes File?
The .gitattributes file is a hidden config text file. It can be placed in the root of your project. It can also be submitted to your repo, it does not contain sensitive data.
In fact it should be submitted to your repo, because you can fix some line encoding troubles if you work with a team and your team mates do use different computer systems like macOS, UNIX and Windows.
Furthermore you can control how binary files should be handled or how files should be treated in a diff tool. Or you can give hints to GitHub how to display and recognize your files. This way the files can be properly displayed and categorized on GitHub website.
And: here we can tell Git how to use our clean and smudge filter.
For an Arduino project you can use a .gitattributes file like in the snippet below. Just copy it into the root directory of your project where the .git folder lives:
# Set default behavior to automatically normalize line endings.
* text=auto

# Force batch scripts to always use CRLF line endings so that if a repo is accessed
# in Windows via a file share from Linux, the scripts will work.
*.{cmd,[cC][mM][dD]} text eol=crlf
*.{bat,[bB][aA][tT]} text eol=crlf
*.{ics,[iI][cC][sS]} text eol=crlf

# Force bash scripts to always use LF line endings so that if a repo is accessed
# in Unix via a file share from Windows, the scripts will work.
*.sh text eol=lf

# Denote all files that are truly binary and should not be modified.
*.png binary
*.jpg binary

# Sources
*.c     text diff=cpp   linguist-language=Arduino   filter=replaceStrings
*.cc    text diff=cpp   linguist-language=Arduino   filter=replaceStrings
*.cxx   text diff=cpp   linguist-language=Arduino   filter=replaceStrings
*.cpp   text diff=cpp   linguist-language=Arduino   filter=replaceStrings
*.c++   text diff=cpp   linguist-language=Arduino   filter=replaceStrings
*.hpp   text diff=cpp   linguist-language=Arduino   filter=replaceStrings
*.h     text diff=cpp   linguist-language=Arduino   filter=replaceStrings
*.h++   text diff=cpp   linguist-language=Arduino   filter=replaceStrings
*.hh    text diff=cpp   linguist-language=Arduino   filter=replaceStrings
*.ino   text diff=cpp   linguist-language=Arduino   filter=replaceStrings
Let’s have a look at this .gitattributes file.
The most important part is this: *.cpp text diff=cpp linguist-language=Arduino filter=replaceStrings
Here we tell Git the following:
*.cppon every file that ends with .cpp- handle it as a
textfile (in contrary to a binary file like images, fonts etc.) - when using a diff tool, handle it as a cpp (C++) file (for a .cpp file this seems to be obvious, but i.e. for an Arduino .ino file it is not)
linguist-language=Arduinotells the GitHub website to handle this file as being part of an Arduino project. There are many projects out there that uses C++ files but have nothing todo with Arduino. So this is just an optional information to have a slicker display on GitHub website.filter=replaceStringsnow here we tell Git to do a filter action called replaceStrings on every *.cpp file when it gets added to staging.
So in fact the most minimal .gittatributes file for a small Arduino project can look like this:
*.cpp filter=replaceStrings
*.h filter=replaceStrings
*.ino filter=replaceStrings
This should cover the most files for a small Arduino project. .ino files if you use Arduino IDE and .cpp and .h if you use additional libraries and/or PlatformIO.
Hey, I have written a great tutorial about Arduino IDE vs. PlatformIO & Visual Studio Code and how to do the first steps in both IDEs!

The Git Search And Replace Script
Next we create a shell script, that will do the search and replace. I will create this script in a folder called scripts in my home folder. I name the script git-replace-strings-filter.sh.
- So open a terminal and go into you home folder with
cd ~ - Create a folder called scripts with:
mkdir scripts - Change into the new folder with
cd scripts - Create new file with
touch git-replace-strings-filter.sh - Make the new script file executable with
chmod +x git-replace-strings-filter.sh
Edit the new file and insert the script from the snippets in the next sections depending on the shell system you use. You can use vim, nano or use code to open it in VS Code (if you added the terminal command of VS Code). Or just open the file manually in your editor.
HINT: How to add the code terminal command for VS Code
Open VS Code and open the command palette (CTRL+Shift+P on Windows or CMD+Shift+P on macOS) and start typing ‘Shell Command’. You’ll see two options: one to Install ‘code’ command in PATH and one to Uninstall ‘code’ command from PATH.
Choose Install 'code' command in PATH. Restart your terminal and now you should be able to use the code command.
Use code . to open the current directory in VS Code.
Use code -n . to open the current directory in a new Window in VS Code
Use code git-replace-strings-filter.sh to open only that single file in VS Code
Use code --help or have look at the docs here: The Visual Studio Code command-line interface.
Bash Version 4+ Search And Replace Script
This version does only work for bash --version >= 4. So this one is not suited for macOS. Bash changed their license to GPL v3 many years ago and Apple does not accept this license. This is why Apple ships only with ancient bash versions from GPL v2 era. And this is the reason why Apple switched to Z Shell (zsh) as their new default shell system. Scroll down for a ZSH (Z Shell) version.
#!/bin/bash

declare -A mapArr

mapArr["qwerty123!"]="YOUR-PASSWORD"
mapArr["mySecretWiFiName"]="YOUR-SSID"
mapArr["my.scret.server"]="YOUR-SERVER"
mapArr["myAPIkey13e#45*+"]="YOUR-API-KEY"

sedcmd="sed"
if [[ "$1" == "clean" ]]; then
  for key in ${!mapArr[@]}; do
    sedcmd+=" -e \"s/${key}/${mapArr[${key}]}/g\""
  done
elif [[ "$1" == "smudge" ]]; then
  for key in ${!mapArr[@]}; do
    sedcmd+=" -e \"s/${mapArr[${key}]}/${key}/g\""
  done
else
  echo "use smudge/clean as the first argument"
  exit 1
fi

eval $sedcmd
ZSH (Z Shell) Search And Replace Script
macOS comes with ZSH as default system shell since 10.15 Catalina. So you can use the following script. Or you have to update the Bash (Bourne-again shell), i.e. with home-brew to a version => 4. Then you can use the bash version above.
#!/bin/zsh

declare -A mapArr

mapArr[qwerty123!]=TEST-REPLACED-PASSWORD
mapArr[mySecretWiFiName]=TEST-REPLACED-SSID
mapArr[my.secret.server]=TEST-REPLACED-SERVER
mapArr[myAPIkey13e#45*+]=TEST-REPLACED-KEY

sedcmd="sed"
if [[ "$1" == "clean" ]]; then
  for key value in ${(kv)mapArr}; do
    sedcmd+=" -e 's/${key:q}/${value}/g'"
  done
elif [[ "$1" == "smudge" ]]; then
  for key value in ${(kv)mapArr}; do
    sedcmd+=" -e 's/${value}/${key:q}/g'"
  done
else
  echo "use smudge/clean as the first argument"
  exit 1
fi

eval $sedcmd
If you want know how this script exactly works do a research about the sed command and how to use associative arrays in zsh and/or bash.
How to Configure the Strings to Search And Replace For
As you can see, you configure the strings to be searched and replaced in this script. You can add as many string pairs as you like to the mapArr array.
In the shell script above you can find four strings to be replaced. Let’s take look at the first one: mapArr["qwerty123!"]="YOUR-PASSWORD"
This means, the script searches for the string "qwerty123!" in your code and replaces it with "YOUR-PASSWORD" before it gets added to Git’s staging space.
How to Add the Git Filter Driver
The last step is to add a filter driver to Git’s configuration. Sounds complicated but it realy is not.
A filter driver in this case is just a path to a script that should be executed in case of a smudge and and clean situation.
Furthermore you can add the driver to global Git config if you add the --global flag. In this case the filter is used on every Git project with this computer user and that has the appropriate .gitattributes file.
HINT: Where is my global Git config?
The global Git config should be in your user’s home directory: ~/.gitconfig
If you don’t want it global, you can omit the –global flag. Then a local .gitconfig file should be created in the root of your project.
I like the global version since I can still control the filtering with the .gitattributes file.
Create the filter driver globally by entering the two following commands into you shell (note the script argument –global):
git config --global filter.replaceStrings.smudge "~/scripts/git-replace-strings-filter.sh smudge"
git config --global filter.replaceStrings.clean "~/scripts/git-replace-strings-filter.sh clean"
And that’s it!
Now, for every .gitattributes record to which you apply the filter=replaceStrings configuration in any repository, every file matching this suffix will go through the script, and every value specified in mapArr will be searched and replaced.
How to Check If the Clean And Smudge Filter Works?
I recommend to check if it works before you push to your remote repository.
Just create a new folder, cd into it and initialize a local Git repo there: git init -b main
Create a new text file in that repo just for testing. Add some text and the strings that should be replaced, i.e. like the following snippet and call it test.cpp:
#include <superfoo.library>
#include "bar.h"

/*** SOME LONGER COMMENTS *************************/
/**************************************************/
/**************************************************/

#define WIFI_SSID "mySecretWiFiName"
#define WIFI_PASS "qwerty123!"

#define DATA_PIN 4

// a function call
start_attack("my.secret.server", "myAPIkey13e#45*+");

/*** SOME MORE COMMENTS ***************************/
/**************************************************/
Save the file.
Don’t forget to copy the above .gitattributes file to that directory as well.
Now you can stage the file with git add .
In fact this will stage all new files. So the .gitattributes file will be added as well, which is no problem at all. You can also use git add test.cpp instead ton only add this specific file to the staging area.
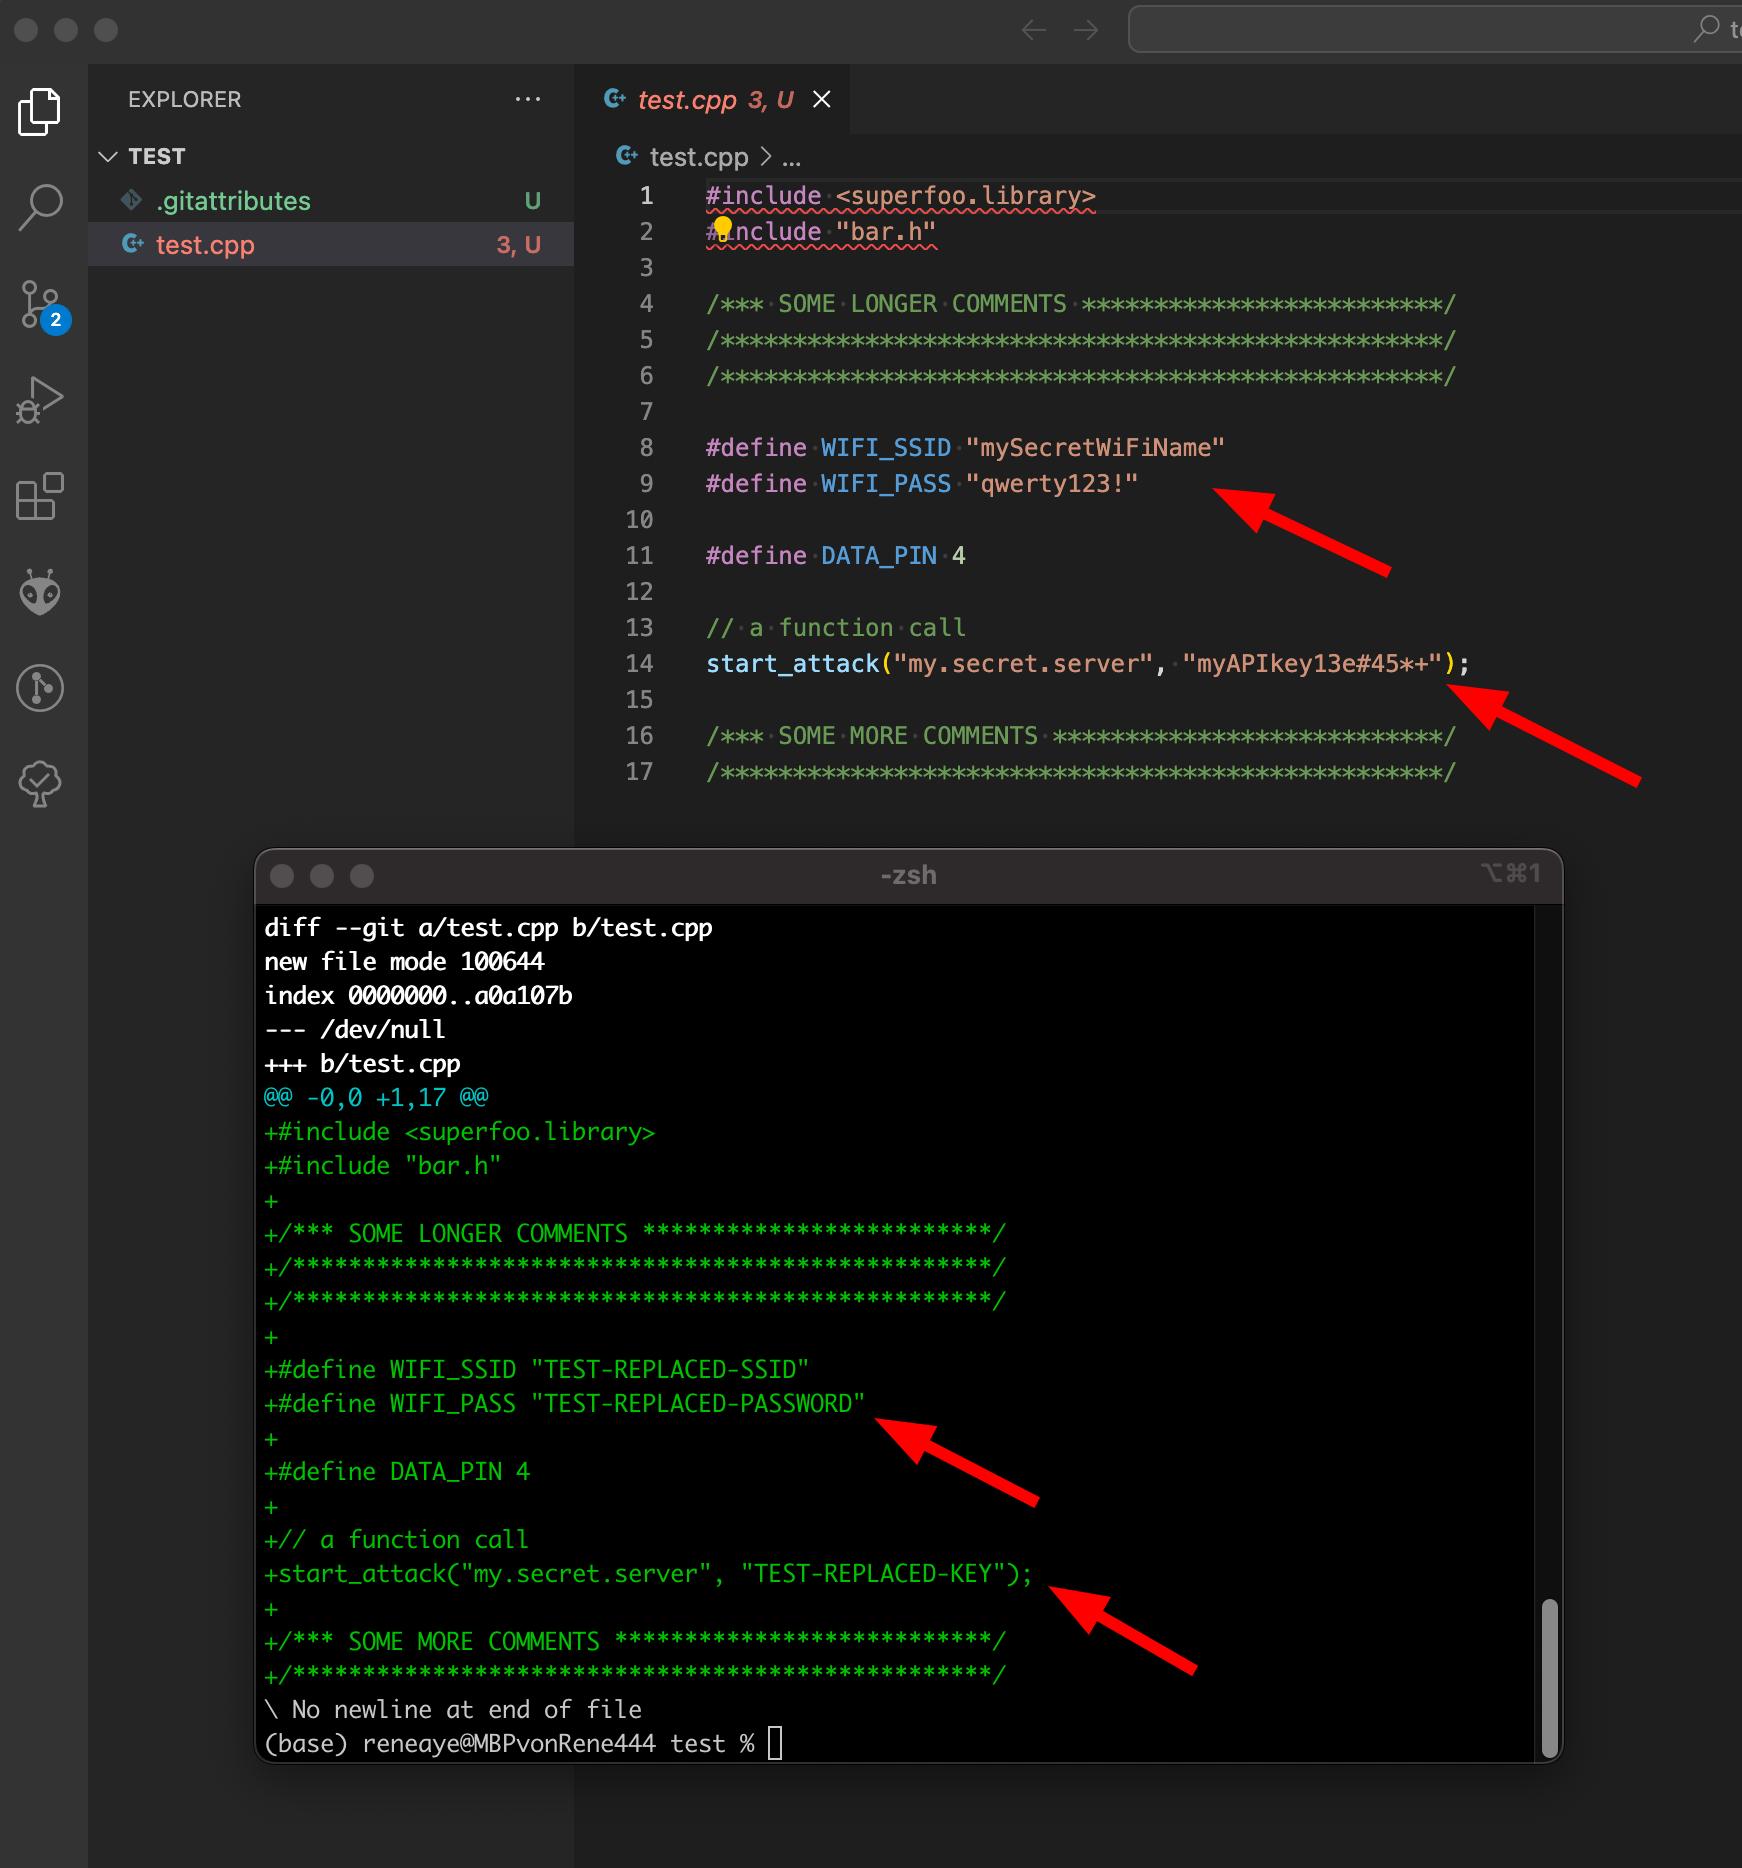
Enter git status to get a list of all staged files. test.cpp and .gitattributes should be listed here in green.
Use git status -v to print out the content of the staged files. Here you can see that hopefully all sensitive data string should be replaced by the clear filter.
This means the file in your working space differs from the file in the staging space now. If you open your working file in your editor, you will still see the sensitive strings.
If you want to change your settings and re-test the filter use the command git reset to remove all staged files and revert to the last state. Then do your changes and re-start with git add . to stage the files and check again.
Possible Pitfalls
If you compare the bash and the zsh version you can see that the associative array mapArr is slightly different. In bash I used quotes and in zsh I did not.
The version without quotes is more universal. If you use quotes, the quotes belongs to the identifier.
So if you use mapArr["qwerty123!"]="YOUR-PASSWORD" it won’t find 'qwerty123' in the code to replace it.
Unfortunately if your key contains special characters it does not work without quotes until you add some special qualifiers.
In the zsh script I used the :q qualifier like ${key:q} which let us use special characters in the keys of the associative array.
Unfortunately I don’t know how to do that in bash. If you know, send me a note or write into the comments.
Helpful Links I Used for Research
Since I did not find a working solution for macOS and ZSH on the net, I did some research and came up with the ZSH shell script above. The following links were very helpful to me to understand the technique behind – especially the Article by Tomer Figenblat from RedHat Developer team. The bash script above is based on his article you can finden in the links section below.
Links
Associative array in Bash
Associative arrays in zsh – Scripting OS X
https://itnext.io/upgrading-bash-on-macos-7138bd1066ba
Secure data in Git with the clean/smudge filter | Red Hat Developer
How to use sed to find and replace text in files in Linux / Unix shell – nixCraft