The Arduino can’t do anything and is way too expensive! What my favorite alternative is and why we still have to love the Arduino, I tell you in this article. I also show how to load a program to an Arduino UNO and to an ESP32 in the Arduino IDE.
If I claim that the Arduino can do nothing, then this is of course completely exaggerated. Only compared to other microcontrollers, the Arduino has become comparatively expensive. The widely distributed Arduino UNO has no Wifi and no Bluetooth, while for example the ESP32 – my favorite alternative to the Arduino – comes with Wifi and Bluetooth. Well, one must also say that the Arduino UNO has certainly a few days more on the hump. But even if we pick out an Arduino model for comparison that has similar features as the ESP32 … but see for yourself.
Before we take a look at the devices again here is a brief explanation why we must love the Arduino anyway: what the team of Arduino built, was simply an excellent complete package. A simple microcontroller, comparatively cheap at the time, together with a development environment that is easy to use. And on top of that we get a framework that is not overly complicated. This complete package finally led to the fact that many people have started programming microcontrollers. Among hobby electronics and in school’s STEM education tinkering with microcontrollers has become normal.
Arduino UNO
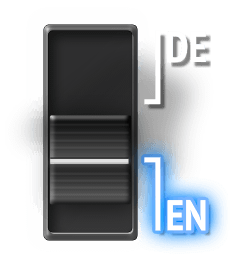
So here we have an Arduino UNO. You can see here the processor from ATMEL. Sensors or LEDs or other components on the breadboard are connected via the pin headers and cables. This Arduino UNO has a USB type B connector for connection to the computer and for power supply. Alternatively, you can power the board via a power supply with a hollow plug. Or you can also power the Arduino UNO via a specific power-in pin.
ESP32 & ESP8266
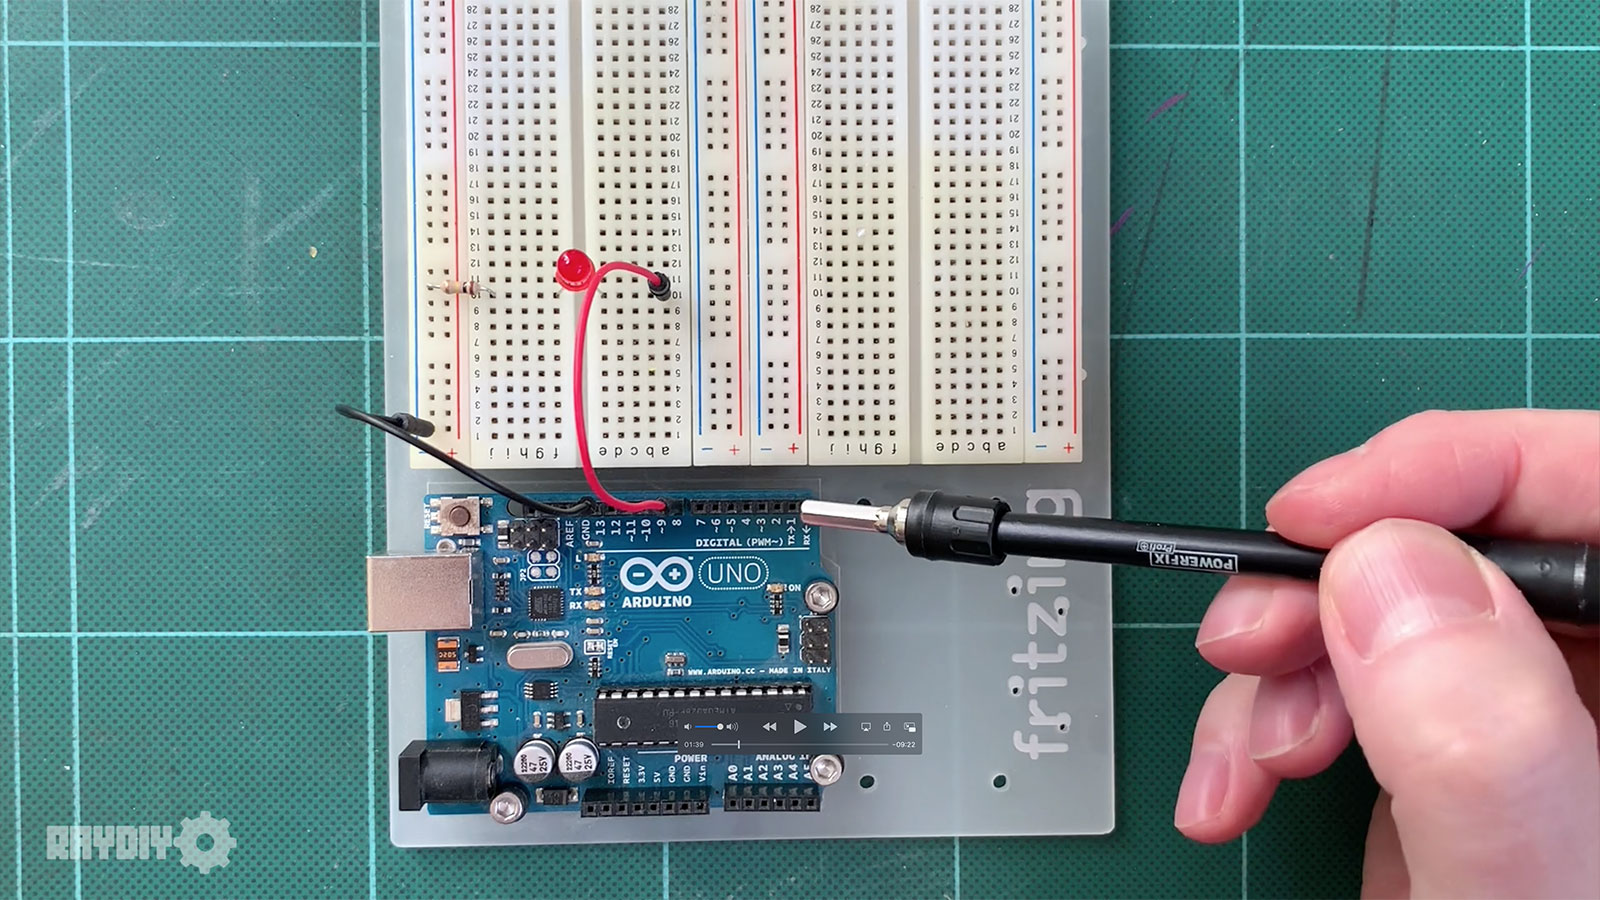
In comparison, here we have the ESPs. You can see right away that they are much smaller. Here we have an ESP8266 and this is an ESP32. The components for Wifi, Bluetooth and microcontroller are hidden under this metal lid. With the ESP8266 then just without Bluetooth. You can also see all the pins to connect the components. This one doesn’t have a pin header soldered on yet, while this ESP here already has a pin header on it.
Due to the pin headers the ESP can be used on a breadboard. So you can connect the pins of the ESPs with components without a soldering iron. The component with the angular snake line at one end is the Wifi antenna. These boards are powered and conneted to the computer via Micro-USB. But you can also power the board via the 3 volt pin. In a separate article I explain how to power the ESP with batteries.
Ok, now we have an overview of the Arduino and ESP hardware. Now let’s compare the “inner values”. For this I have created a small table. In the table I listed which features the different Arduino boards and ESP8266 and ESP32 have. I have not listed all Arduino boards, because there are so many different Arduino boards. I just picked out the classic Arduino UNO and Arduino Nano. And then I picked out another Arduino, which comes close to the ESP boards in terms of features, namely with Wifi and Bluetooth on it – the Arduino MKR WiFi 1010.
| Arduino UNO | Arduino UNO R4 | Arduino Nano | Arduino MKR WiFi 1010 | ESP8266 | ESP32 | |
|---|---|---|---|---|---|---|
| Wifi | 802.11 b/g/n bis zu 72.2 Mbps | 802.11 b/g/n bis zu 72.2 Mbps | 802.11 b/g/n bis zu 150 Mbps | |||
| Bluetooth | Bluetooth 4.2 und BLE | Bluetooth 4.2 und BLE | ||||
| Speicher für Code | 32 KB | 256 kB Flash | 32 KB | 256 KB | bis zu 16 MB 512 KB bis 4 MB üblich | bis zu 16 MB 4 MB üblich |
| Speicher für Variablen | 2 KB | 32 KB | 2 KB | 32 KB | 64 KB | 160 KB |
| GPIO | 30 Pins | 30 Pins | 30 Pins | 28 Pins | 16 Pins | 38 Pins |
| CPU | 16 MHz | 48 MHz | 16 MHz | 48 MHz | 80 Single Core oder 160 MHz Dual Core | 160 Single Core oder 240 MHz Dual Core |
| Betriebs- Spannung | 5V | 5V | 5V | 3,3V | 3,3V | 3,3V |
| Preis | 27,90 € | 21,42 € | 25,77 € | 39,97 € | 6,99 € | 8,49 € |
Let’s go through the table.
WiFi and Bluetooth, we can quickly see, only the Arduino MKR WiFi 1010 and the ESP32 have that. The ESP8266 has WiFi but no Bluetooth.
Memory – that’s where it gets interesting! Memory is important when it comes to the maximum size of the program you can load on the microcontroller. Once your programs get bigger, memory is immensely important.
GPIO – this is the number of pins that are on each board. Here you need to know: you can’t use every pin freely. Some are blocked for internal processes. Some are for power supply. But this is true for all microcontroller boards. From there the tendency is already correct that the ESP32 has more pins than the ESP8266 or the Arduino MKR.
In CPU we can see which processor has the highest clock speed. The higher the clock speed, the faster calculations are performed. Special feature of ESP32: it has a dual core processor. That means it can run two processes in parallel.
Operating Voltage – also interesting. This isn’t the power supply for the board, but sort of how much voltage comes out of the pins to power the sensors or LEDs or other components. In the past this was more complicated, because there were usually only 5 volt compatible components and then had to work with level shifters, if you then times worked with a 3.3 volt board. Today this is not a problem anymore. You can get most components for 3.3 volt boards.
And finally the price and there you can see quite fast: the ESP32 has the best features and a comparatively low price compared to an Arduino board with similar features.
Interim conclusion
Arduino UNO or Arduino Nano? Actually there is no reason to use the UNO. The UNO and Nano are virtually the same hardware. Both can do the same and the Nano is a bit cheaper. The only exception: if you want to use shields that are built in the Arduino UNO form factor, then of course they only fit on the Arduino UNO.
And which ESP should you use? The ESP32 also has Bluetooth, is a bit faster and has faster Wifi. If you want to be on the safe side, then you just take the ESP32. Personally I had bad luck with the ESP8266: got 5 of them, but I couldn’t use any of them. Uploading a program to any of them has always aborted – maybe I fell for cheap imitations. Therefore, I am happily stuck with the ESP32.
Practice Comparison Arduino UNO VS ESP32
After the feature comparison, let’s now do a little practice comparison. Let’s take a look at how to connect the devices and how to load a first program on the Arduino UNO and the ESP32. For this we use the Arduino development environment, also called Arduino IDE.
To connect, simply plug the USB type B connector into the Arduino board and the USB type A end into the computer. By then, some of the LEDs on the board should be blinking.
We start the Arduino IDE. There we create a new sketch and save it first. For comparison we take a simple blinky code – quasi the “Hello World” of microcontrollers.
int LED = 4;
void setup()
{
	pinMode(LED, OUTPUT);
}
void loop()
{
	digitalWrite(LED, HIGH);
	delay(10);
	digitalWrite(LED, LOW);
	delay(250);
}
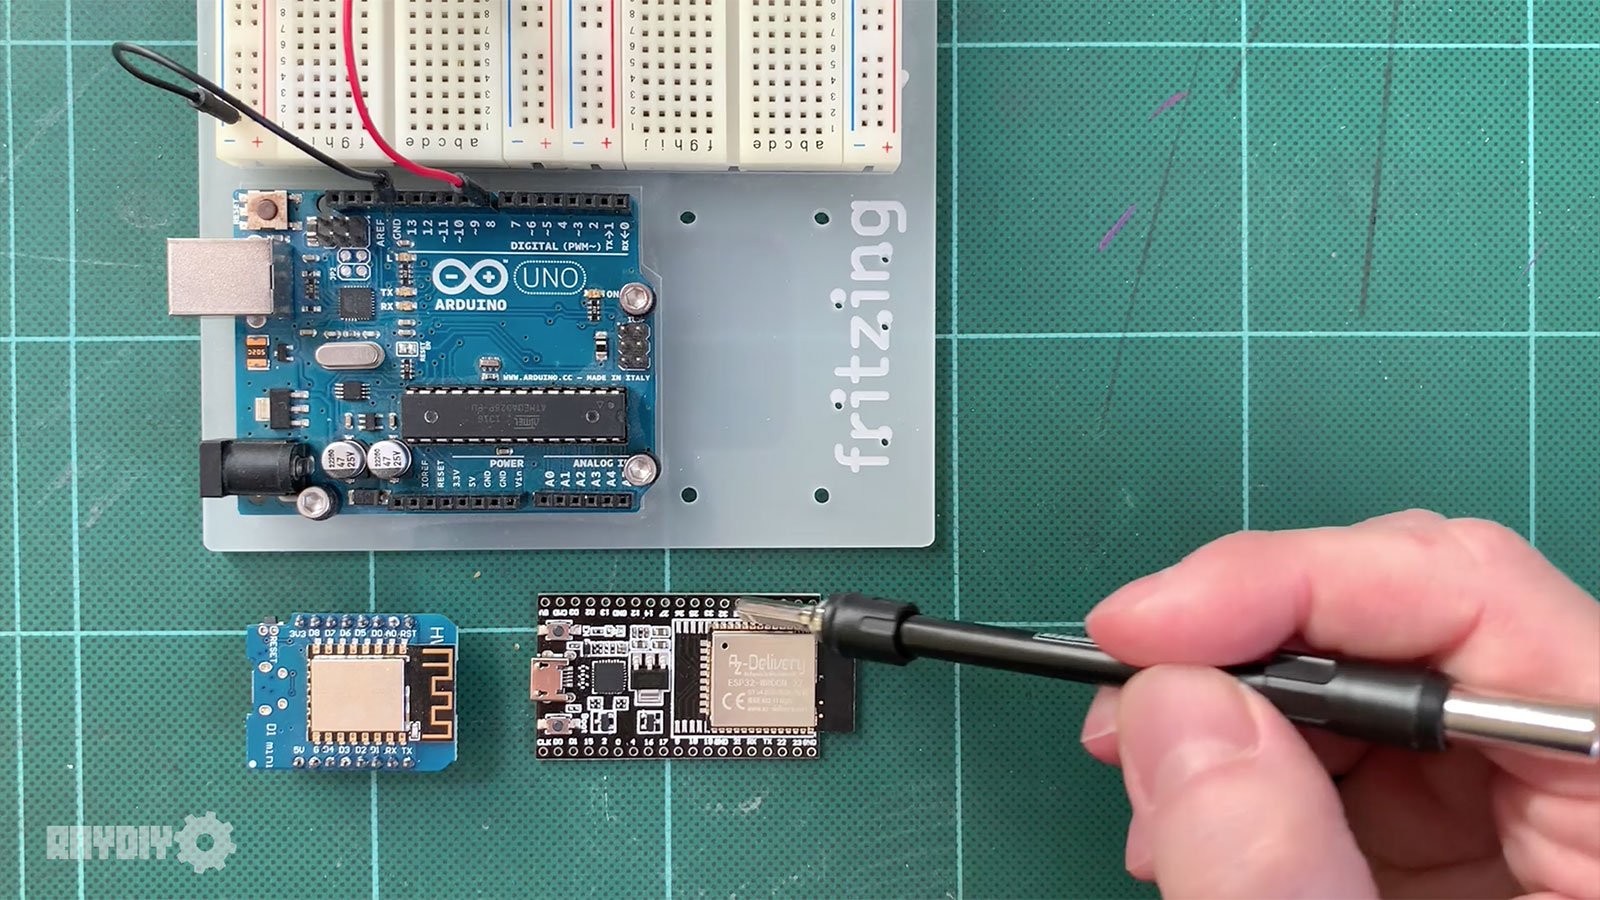
In the code, we first define to use pin 4 to control the LED. So our LED needs to be connected to pin 4. In the setup() method, we say that pin 4 should only put out power. The pin should not listen for input, like a switch for example. And in the loop we set the current of pin 4 alternately to HIGH and LOW, i.e. the LED is turned on and off. Between HIGH and LOW we set some delays, because otherwise we wouldn’t see the turn on and off at all.
At the top the switch with the arrow icon finally loads the program to the microcontroller. If everything worked, the console prints out a corresponding message. And our LED is blinking now.
Now let’s do the same thing again with the ESP32. To do this, we first disconnect the Arduino and then we need a micro USB cable to connect the ESP to the computer and supply it with power.
Also, we need to reconnect the cables on the breadboard so that the LED is now connected to pin 4 of the ESP. And, of course, we need to connect Ground.
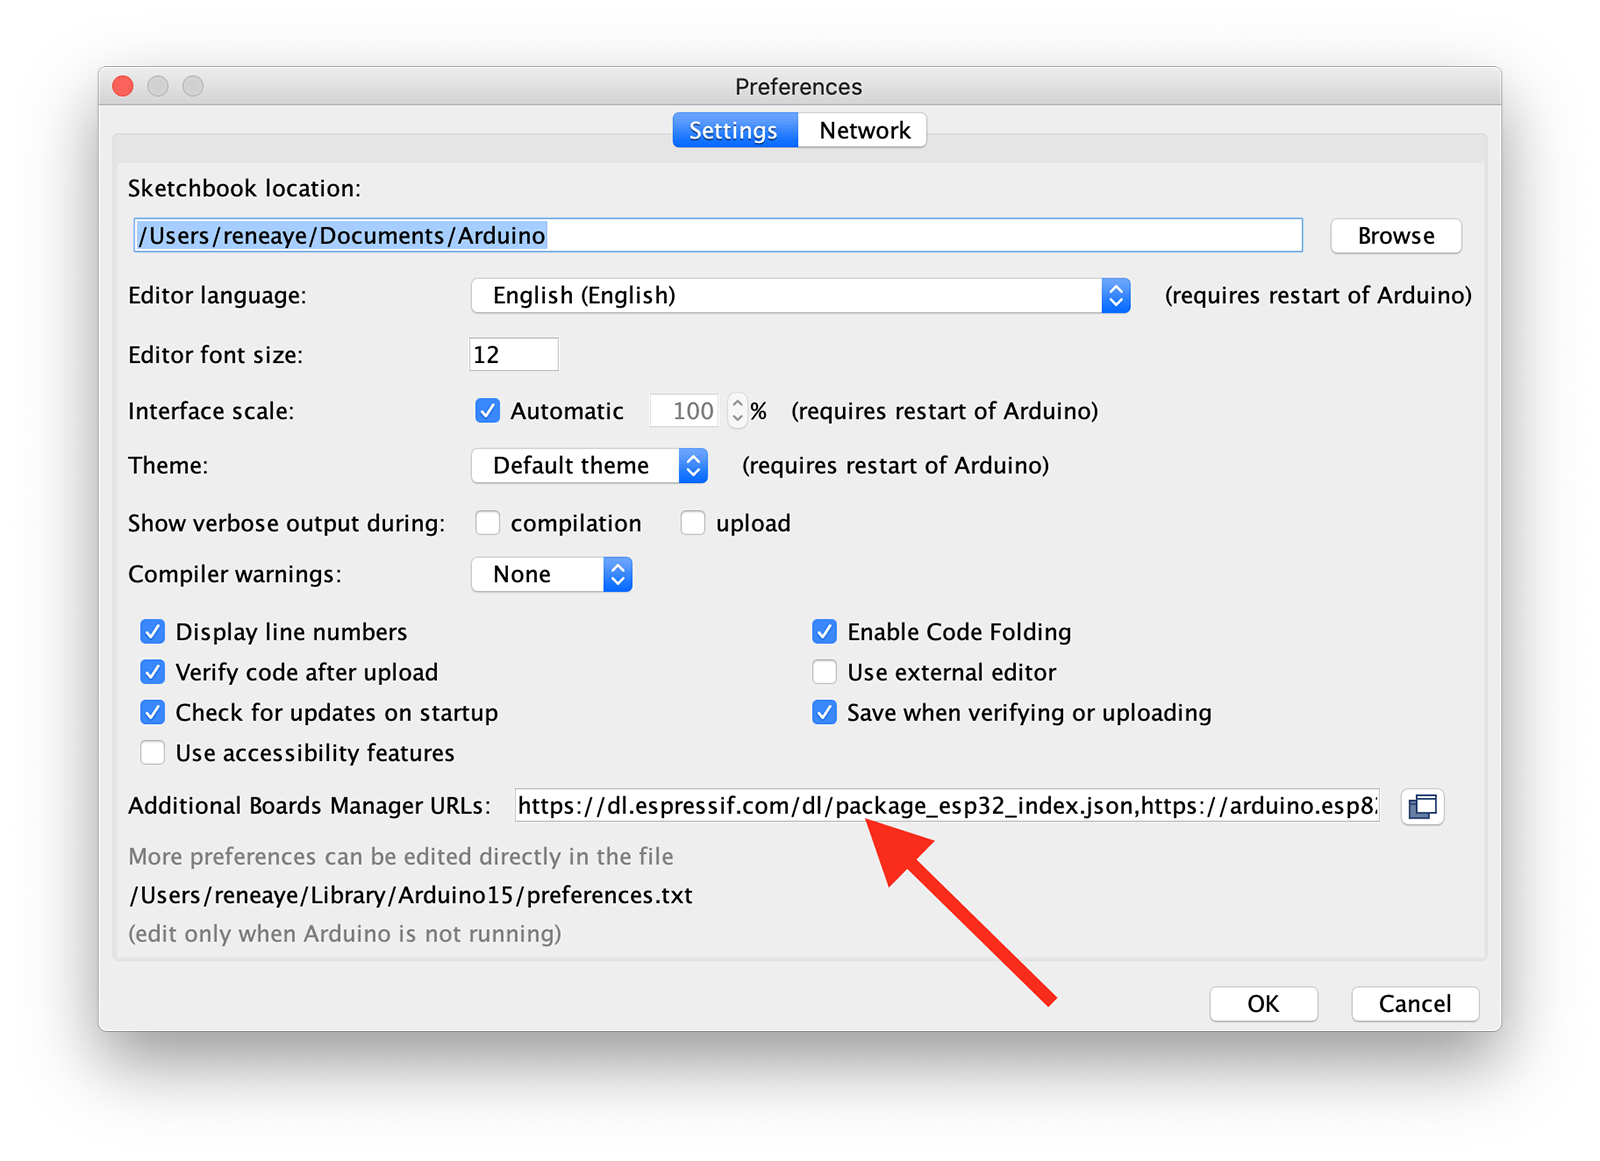
When you use the ESPs for the first time in the Arduino IDE, you must first add them to the so-called board manager, so that the Arduino IDE can address the ESPs correctly. For this there is in the menu under Arduino > Settings the field Additional Board Manager URLs. Here we need to add two addresses. One address for the ESP32 boards and one address for the ESP8266 boards.
Then enter both URLs in the field separated by a comma:
https://dl.espressif.com/dl/package_esp32_index.json,https://arduino.esp8266.com/stable/package_esp8266com_index.json
Confirm with OK and then in the menu under Tools > Board various ESP boards are now available. We must also make sure that the correct USB port is set. On Mac OS this is usually this SLAB_USBtoUART and on Windows this would be a COM port. If we now send the code to the microcontroller, the LED should flash again – but this time controlled by the ESP32.
Conclusion Arduino VS ESP
As you can see, you only need to have the ESPs added to the board manager once. After that, programming runs the same way as with an Arduino. What else you should know is, by adding the program via the Arduino IDE, we also played the Arduino framework on the ESP. This means that we are now using the Arduino framework on the ESP. The manufacturer Espressif offers its own framework, called ESP-IDF. But since the Arduino framework is so popular, it was ported for the ESPs.
By the way, I almost don’t develop in the Arduino IDE anymore, because the development environment doesn’t offer me enough features. And for larger projects, it quickly becomes confusing. Here I wrote an article about which alternative IDE I use and how to load programs to the Arduino and ESP with it.
But of course we love the Arduino IDE a lot too 😉